


What Does Home Mean to You?


Types of Concrete for Walkways
- Details
- Category: Your perfect home
 Disparities The Difference Between Walkways and Pathways
The materials used to create pathways vary from those used to construct walkways in most cases. Pathways are mostly made of natural materials like loose gravel or mulch, while walkways are typically made of stable hardscape materials like poured concrete, massive slabs of mortared stone, or pavers.
Walkway and Pathway Design Considerations
Maintain a consistent walkway design. If you live in a formal setting, symmetrical lines can be the best option. Consider using big flagstones for a more natural look if you have a country-style home. When discussing a project with their landscaper, homeowners should consider weather conditions and possible uses for the walkway or route, as these can help decide what design principles are best for their space.
Trends in Design
Acid staining and stamping concrete have recently become very common trends in walkway design, providing cost-effective ways to beautify standard poured concrete. These processes, however, do not last indefinitely and frequently require annual maintenance. Pre-existing concrete may be stained with acid stains, making this a cost-effective choice for homeowners looking to renovate concrete walkways. Acid staining can be performed effectively by DIYers on occasion.
Match the color of the walkway to the color of the house when staining or dyeing concrete. Earth-tone colors are also a good contrast to the exterior of a house. When designing a pathway, use natural colors that blend in with the surroundings.
Considerations for Planning
When selecting materials for a walkway or pathway, there are a few things to keep in mind:
There is a budget. When choosing materials for a walkway or pathway, the homeowner's budget is the most important consideration, as cost determines what materials are accessible.
a shady area Another consideration to consider when choosing which materials to use in walkways and pathways is the amount of shade available. Moss and mildew can grow on stone and concrete, making it slippery and dangerous. For pathways in shady areas, use trail mix, which is a natural mixture of aggregates. Use pavers instead of poured concrete for shaded walkways.
Construction of a house. Take a look at the colors and siding on the house. Is it made of brick? Is it stucco? Siding made of wood? When designing a walkway, choose a color that complements but does not exactly fit existing structures. If your home has a brick exterior, for example, choose a color from the brick walls to use in the walkway.
When Should I Wash My Hands During Covid-19?
- Details
- Category: Your perfect home
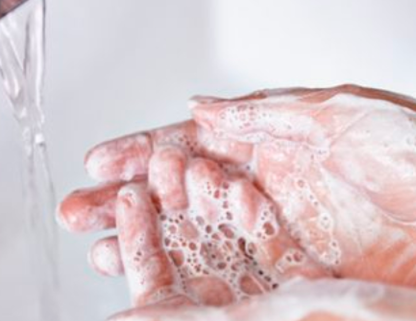 Although it is useful to wash your hands to prevent yourself from being sick, this is not the primary reason the government recommends it.
 Does soap kill coronavirus?
The 'enveloped virus' is a coronavirus. This implies that it has a defensive outer layer called a 'lipid bilayer'. With a water-loving (hydrophilic) round head and a water-hating (hydrophobic) tail, the molecules make up this layer are formed like a tadpole.
These molecules are organized into a bilayer: two layers are stacked into a sheet on top of each other, with tails pointing inwards and heads pointing outwards.
To shield the hydrophobic tails from the water in your respiratory droplets as you cough or sneeze, the molecules are tightly drawn towards each other.
The hydrophilic heads are very 'sticky' which ensures that the virus sticks to your hands very efficiently, ideal for a microbe that tries very hard to infect you.
This tadpole structure even has soap ions, which is what makes it so useful. Running water won't get rid of it because you have something sticky on your hands. The hydrophobic tail will adhere to the liquid, and the hydrophilic head will stick to the water. Add soap to your hands. Now, the oil is coming straight off.
The molecules in the lipid bilayer are as strongly attracted to soap molecules as they are to each other, since the soap molecules are so close to the ones that make up the outer layer of the virus.
This interrupts the neatly-ordered shell around the virus, dissolving it and destroying the virus in the flowing water.
Can washing my hands stop coronavirus?
Unfortunately, it's impossible to tell if better hand-washing may have stopped any specific case of coronavirus.
Although coronavirus can be transmitted by rubbing your face with hands contaminated with viruses, you can also catch it directly from an infected person's coughs or sneezes.
So, it's a sensible and powerful safety measure, though washing your hands won't remove your risk of infection.
How do I have my hands washed?
Start by moistening your palms. If it's hot or cold, it doesn't matter: a study from Rutgers University in the US in 2017 found that cold water was just as good as hot at removing E. From coli.
Next, add either bar soap or hand wash with liquid. While there are studies that have shown that bacteria can live on the surface of a soap bar, others have shown that no disease is transmitted by sharing a bar.
Rub the soap vigorously over both of your palms, making sure your thumbs are not missing, between your fingers and your fingertips. It should take 20 seconds for this portion of the operation. To count out 20 seconds, the NHS suggests singing 'Happy Birthday' twice, but you can pick any song with a 20-second chorus, such as Dolly Parton's Jolene, or Staying Alive by the Bee Gees.
Prepare your house for sale after divorce
- Details
- Category: Your perfect home
As if selling your property wasn't stressful enough, if you're in the thick of divorce proceedings it can turn from mildly trying to an absolute nightmare. Going through a divorce, especially if it is a heated one, can render you completely mentally and emotionally drained. You most likely will not have the energy left over to think about selling your home on your own. This is a great example of a single situation where you will definitely want a professional to assist you with the selling procedure. To undergo selling a home after a divorce, then you'll want proper legal assistance in addition to a certified real estate agent. This can allow you to clear up the property facet of the branch.
You can get a sympathetic yet professional realtor. In this delicate and trying time, it is more important than ever to have someone who you feel comfortable with on your side. Get these tips suggested by divorce lawyer columbus oh and compare credentials to come across an person you trust to assist you with selling your property.
Although handling credit card lenders, attorneys, and banking is likely not something you look forward to whilst tackling the emotional fallout of a divorce, unfortunately it is something that is necessary. It's best to look after this earlier rather than later to avoid greater confusion or even hostility. Listed here are a couple of jobs to sort out instantly.
Take a listing of all Financial Accounts
In most cases, married couples place down both names on shared reports. You're both responsible for all these shared accounts. Start the process of planning to sell your house by taking inventory of any monetary obligations you are both responsible for. Remove your name every time necessary so that you aren't held accountable for your spouse's debts. 1 example of this might be a line of credit on your name. If you opened the accounts collectively, the lender may refuse to take one name off of the accounts. In these cases, you'll want to close the account and begin a new one in one name only.
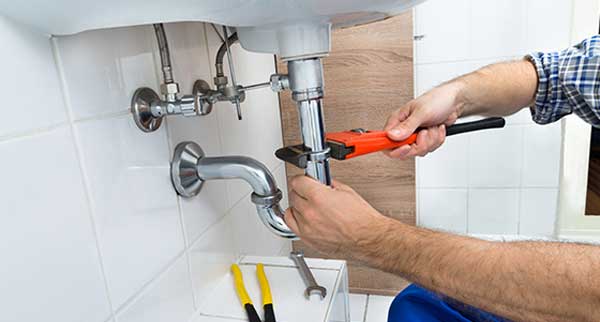
This could include repayments such as a car loan or house mortgage. If a mortgage is stored in both names, it is best to attempt to refinance to avoid being hit with any surprises in the future. This is something that it's very good to speak to your realtor about as you're getting organised. Bear in mind that even if your partner is living at the home and it is under their title, if both your names are on the mortgage you could still be held liable for payment. Talk to your broker about the possibility of refinancing your loan to avoid large debts in the future.
Refinance your Existing Home
Typically, this is your most valuable asset. It is important to go through all of the red tape to make sure that you settle this advantage properly and do not leave any open ends. If you're maintaining the house, it is well worth hiring a solicitor to make sure that the house is transferred legally into your name. You will also need to refinance and replace the outdated joint mortgage with a fresh mortgage that is only on your name. You may have to ask someone near you to co-sign on the new mortgage in case you aren't able to satisfy your lender's fiscal requirements by yourself.
Selling Property
Once you've sorted out all your joint and separate accounts and are prepared to proceed, you will find it is time to sell your house. To do this you'll need to find out what the value of your house is, and search around to get the appropriate real estate agent to work with. You can prepare your house before it goes on the market by removing clutter, cleaning it from the top to base, and addressing any outstanding demand for repairs and maintenance. Staging your home can help it stand out to prospective buyers throughout open inspections. This prep work can make your property sell in a shorter amount of time at a greater profit. Don't let on that you're going through a divorce when you are revealing the property to buyers. They might try using this through negotiation, since they'll be aware that you're needing a quick sale.
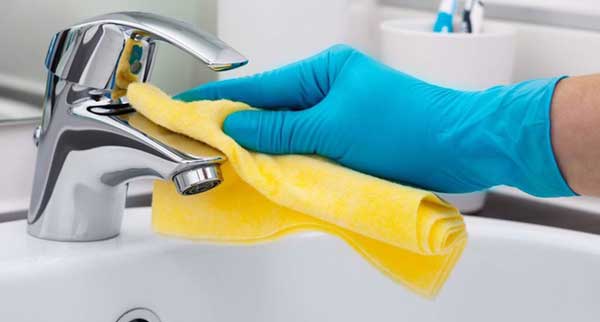
Useful office cleaning hints
- Details
- Category: Your perfect home
Maintaining your workplace tidy shouldn't be a hassle. It does not matter if you wash daily, monthly or weekly, or you employ an office cleaning Durham NC professionals. Your working area should be maintained clean.
As clear as this might be, you ought to have a look around your workplace. If Accreditation is piled up anywhere, you have an issue. Nonetheless, it's simple to repair it. All you have to do is locate the suitable storage for every kind of file.
Maintain your public place blank Stress how important it's to maintain it as clean as you possibly can. The seating area ought to be dust and blot. It is easy to do this using a duster and a few clean rags. What's more, in case you've got a rug on the ground, you ought to be vacuuming it at least once each week.
The same as the general public place, your workplace area ought to be nice and clean. That Means dusting each week, cleaning the wires from each the electronic equipment, etc. Employing a dust-repellent spray onto nearly all surfaces will guarantee a dust-free place for at least a week. Also creates a much healthier environment for those workers that work at the workplace. Healthy workers means fewer days off because of illness, which translates into greater productivity. Employing a professional office cleaning firm will save a great deal of hassle and time.
Clean your electronic equipment frequently
Dust comes with an affinity for digital apparatus. That is why it'll build up Quicker and it's going to be visible around digital devices and wires. Make sure you utilize some disinfectant when cleaning the phones, because a great deal of germs collect on the phone receiver.
Office cleaning is not complete without taking out the garbage. Put a few Trash bins at the most circulated or populated regions and make sure you take the garbage out every other day. Do not allow the garbage stack. If you'd like a clean workplace, you can not be lazy about it.
Maintain the desks tidy
A significant source of workplace clutter is cluttered desks. While some Folks work Better in insanity conditions, the requirement to maintain the desks clean remains current. This will permit your workers to maintain their working area tidy and germ-free.
The kitchen Ought to Be pristine
If your workplace has a kitchen, then you should take particular care when cleaning it. Food should only be kept in fresh cabinets and receivers. Clean these daily since the wellbeing of your workers is extremely important.
Tidy-up the rest room
Some offices have split rooms which are different from the kitchen. If that is Your situation, ensure that your break area can also be clean.
Not everybody has enough spare time to perform all of the cleaning job. That is why Some office owners employ specialist office cleaning firms for this particular job. They will use services that are professional and their experience, which will help in The very long term. Not having to spend Additional time cleaning your workplace is a Requirement for productivity.
Make your house clean during holiday season
- Details
- Category: Your perfect home
If you have ever looked in a magazine article or blog post on vacation Decorating, you have probably noticed that they all have something in common: the rooms that they feature will be spotlessly clean. Stick to these easy house cleaning cape cod tips to receive your home looking its best.
Create a House Cleaning Checklist
Before beginning house cleaning, pick what is most important to you personally. If You'll have guests to the holidays, the principal rooms of your house might be the most crucial. If you're going to be traveling for the holidays, it may be more critical to be certain that the bedrooms and kitchen are clean and ready for the return. Creating a comprehensive checklist can allow you to keep on track, and certainly will make it much easier to enlist the assistance of other relatives.
Each area in your home will require its own Kind of care to select from"lived-in" Follow these vacation home cleaning tips to find the main rooms in your house ready to observe:
Entryway: Make certain the first thing that your guests visit is not a heap of muddy boots. If you prefer your visitors remove their shoes, then give a shoe rack along with a seat or seat close to the front doorway. Maintain your household's shoes neatly lined up. Dust the doorframe, light fixtures, and some other attributes from the entryway, then complete with a comprehensive sweep and vacuum or mop.
Living Rooms and Bedrooms: When you own pets, then make use of the wand attachment on your vacuum cleaner to eliminate any hint of pet hair in the furniture. As you're dusting, eliminate any clutter that does not actually belong in that area. Finish by cleaning the flooring and light a candle or plugging in an electrical odor diffuser to give your house an inviting scent.
Kitchen: Start by washing any dirty dishes left in the sink either load the dishwasher or wash them. Wipe down the counters and stove, including the hood and backsplash. Grease tends to accumulate on the cooker hood, providing the entire space a filthy feel. Wipe out the sink, and place a complete lemon (cut into quarters) throughout the garbage disposal to get rid of any scents. Leave the warm water from the microwave for a moment to permit the steam to loosen cooked-on dirt, then wipe it all clean.
Baths: There is nothing worse than a filthy bathroom! Wipe down all hard surfaces, and wash out the toilet, indoors and outside. Sweep and wash the floors, then put out clean towels.
Before guests arrive, put in your favorite holiday songs, and put out Coffee, coffee, or other drinks. Have a moment to enjoy the quiet and peace in Your beautifully clean house!
Clean your house in half an hour
- Details
- Category: Your perfect home
Follow this half an hour strategies granted by maid service haverhill ma to get a lovely and amazing house.
Floor about it using cleaner. Let it sit while you clean the countertops off so the cleanup option may do the hard work for you. Then, spray on the counters.
Pay particular attention to the dirt and water deposits that accumulate around the drain, sink and faucet handles, which may detract from a bathroom.
Tackle the bathroom. Brush within the bowl , then Clean out the tank, chair, foundation and flooring with disposable wipes which it is possible to trash immediately.
The switch plate is among the very Frequently handled regions of your house and the last thing that your guests will see if they leave the restroom. Eliminate any muck with one fast swipe until you walk out the doorway.
Spot-clean. Utilize a moist wipe or paper towel to wash the counters, dining table and within the refrigerator where dirt or food is clear. Repeat to the flooring.
Create the sink glow. When you are done prepping and Cooking for your celebration, scoop out some pieces of food out of the drain using a paper towelthen spray on the sink using a cleaning solution and wash. Be certain that you wash away puddles of water below the soap dispenser, also.
Cabinets, walls and appliances for unsightly marks and stains. Use a cleaning brush or melamine sponge, such as Mr. Clean Magic Eraser, to swiftly eliminate anything glaring (recall, you can perform a deep-clean afterwards ). Next, until you throw it off, then run the mat or brush over the garbage can.
Pour vinegar and water into a Bowl and heat for 30 minutes. This may loosen any caked-on meals so that you can swipe it off without scrubbing.
Wear a microfiber mitt and fast run For ceiling fans, slide an old pillowcase over one blade at a time and use it in order to pull off and grab some other dust bunnies hanging out at the top. Squeeze the loose dust from the garbage, then reverse the pillowcase inside out and wash it and also the cleanup mitt along with your next load.
Your sofa cushions, lampshades--over stains of a room rug--to pick up strands, fuzz and bigger pieces of dirt. If the floor wants it, then hit for a handheld or normal vacuum rather than wasting time coming up using a broom. You then won't have to bring a dustpan or create an additional visit to the garbage can when you are done cleaning.
Suck dirt up. To eliminate debris from the door, Quickly operate the vacuum. But resist the impulse to mop! After guests arrive, they will bring outdoors elements in together so do your self a favor and leave heavy cleansing for the following moment.
Create a fantastic impression. If you do not Possess a floor bin close to your doorway to corral shoes, conceal them in a cunning shopping Bag and put it on your coat rack.
Mother and children: family cleaning ideas
- Details
- Category: Your perfect home
Get the most peculiar part within first. Seriously. You Understand that daunting task is following you about nagging on mind and stressing you out. Can it , and watch how much calmer you are feeling for the remainder of the day. All of the remainder of your activities will look a whole lot more accomplishable once you've already finished the hardest undertaking of daily.
Designate a particular clean-up moment. Daily in Precisely 3:00 PM, you'll discover my kids scampering through the home to pick up their toys. They understand that 3:00 is cleanup time, and it prevents us from fighting picking up their toys daily. In reality, once I let them pick up their toys, the earliest two children run to check the clock to be certain it is, actually, 3. When you wash up at precisely the exact same time each and every day, it turns into a scheduled regular, and much more than this, a custom. Children thrive on programs, and this specific program will help your cleaning jobs.
Declutter from 1 end of the house to another. For A fast decluttering, begin at the same side of the home. When you are done with the initial room, proceed to another, and do exactly the same, now additionally putting any clutter out of the laundry basket which belongs in that area off. This is a quick and effective approach to declutter the entire home without making a number of trips back and forth to different chambers.
Professionals from cleaning services akron ohio suggest to clean each of the flooring simultaneously. Rather than getting out And putting the broom, vacuum, or mop a number of occasions, simply do all of the flooring simultaneously. It is considerably more efficient than quitting in every room to wash different things and then beginning again. 1 vacuum swoop throughout the home could take as few as 10-15 minutes!
Put your children to work. You actually have a Get creative here since cleaning up for children can actually be enjoyable. Example? Quit ramming your trucks to the walls! I am not sure what the interest is here, but it is true. It. Is. Great. They really ask me to perform this chore often, and it is likely because they feel as though I am letting them do something they are normally not permitted to do. Do be cautious with cleaning products and be certain that the job is age right, or you will probably wind up getting a bigger mess than when you began.
Clean as you are cooking. When you are cooking Utilize those couple of minutes to clean the kitchen up. Wipe down the counters which you're using to prep along with any bowls or baskets which you are already done .
Clean all mirrors and windows simultaneously. Only Such as the flooring, it is easiest and quickest to wash all mirrors and windows simultaneously. This way you are just carrying a cleaning product from room to room, and along with your attention on just 1 job, you are going to do it quicker.
Multi-task. Set Your super-human multi-tasking abilities To utilize! If You Have to telephone the doctor now, do it fold Laundry.I frequently wash my dishes and wash the counters in precisely the exact same moment. This way if something needs a moment to soak, I am not just standing there soaked.
House cleaning methods for the whole family
- Details
- Category: Your perfect home
Just because your program is chaotic, does not mean your home needs to be. Between football practices, ballet classes, piano lessons and also the typical daily load of actions, finding the time to keep your home clean and coordinated seems like a dream. We all know how you're feeling. That is why we've produced some home business ideas to assist the smaller items fall right into line, so that you can keep your eyes on the prize. With a couple quick house cleaning scottsdale strategies for busy mothers, we'll have your home whipped into tiptop form.
piano lessons and also the typical daily load of actions, finding the time to keep your home clean and coordinated seems like a dream. We all know how you're feeling. That is why we've produced some home business ideas to assist the smaller items fall right into line, so that you can keep your eyes on the prize. With a couple quick house cleaning scottsdale strategies for busy mothers, we'll have your home whipped into tiptop form.Which you feel nervous about throwing off? Do not! Use them to tie round your sheet collections at the cupboard so you will not ever need to search for stray pillowcases or underside sheets.
Maintain your previous bank check boxes and utilize them for your dreaded junk drawer. Among the very best home business ideas, it is nevertheless a crap drawer but it will look fine and assist with your sanity.
Maintain all your directions and guarantees in a three-ring binder so that you will not be stuck sifting through newspaper piles.
On a tiled bath wall, hang on a mesh laundry bag in suction-cup hooks to Store tub toys.
Designate each child their own cup and state it's their cup. Attach This will cut the number of dishes and educate your children to keep an eye on their possessions.
Use a dollar shop shower caddie at the car for any moment that your household is Having foods on the move. Carry your kids' food from the bag and to the shower caddie to reduce spills and dropped chips.
Have more than 1 child? Rather than writing names on labels, use the scatter Technique To different clothes. The oldest kid gets one dot, the next -- two dots, etc.
If you are still in the baby phase, adhere a plastic hook onto the back of a High seat to maintain bibs.
Use old shoeboxes to maintain your children crayons and coloured pencils.
One hour cleaning guide
- Details
- Category: Your perfect home
Cleaning the home does not need to be a dull or drawn out event In reality, with the inclusion of some pumping songs and a cleanup caddy near hand, you are able to knock it within only within an hour!
Cleaning the home can occupy an whole day if you allow it. There's always Something to wash dust, sweep or polish. The key to speeding up the cleanup job is to remain focused on the job at hand. A rate clean is a 'regular' sort of wash - a profound scrub, yes, of everything, no.
A rate clean concentrates on certain tasks and does not detract from them. So no, You're not permitted to get diverted placing the refrigerator magnets into alphabetical sequence or turning the pillow stripes up the ideal way. But OCD cleaning is an entirely different subject. Speed cleaning ideas offered by house cleaning minneapolis is really for getting the task done, not overdone.
All of the tools you want
Audio
First you wish to place on a playlist which makes you want to dance. You Want a Good, powerful rhythm to keep your momentum going. Additionally, music makes cleanup a little less dull. Will be a workout plus a clean home in a single? Result!
Provides
Nowadays you have to collect your supplies. That allows you cart your own supplies with you where you have to go. It is possible to purchase a unique cleaner caddy, or you may just use a bucket or perhaps an old bag bag.
Have a coffee cup and then pour in approximately 1cm vinegar. Place Leave now.
Laundry basket.
Load and twist dishwasher and wash and remove any residual dishes in The sink.
down.
Spray on the stovetop with proper cleaning product (depends upon your cooker ) And wash down. I've an old-style cooker and utilize all-purpose spray using a micro-fibre fabric and steel wool round the components to wash off any built-up gunk. Don't forget to wash the cooker controls.
Take the cup from the microwave, tip the vinegar out and then scrub and dry the mug. The vinegar steam will probably have raised off any gunk from the microwave well, so all you've got to do is give it a clean.
Catch your laundry basket and visit the living places.
Then collect up anything that does not belong into the living room and set it to the basket.
Give the Entire space a dust - particularly around the tv and other Electronics which collect dust quicker than anything on account of the static power they create - then wipe all surfaces. (I spray on a tiny all-purpose spray on a moist cloth and do it)
Must be re-homed.
Polish today if polishing is the thing.
Carry your laundry basket to the bedroom and put away anything which belongs there. Insert anything that does not to your jar.
Instantly pick up and reassign whatever that's out of place. Recall To check beneath the bed/s!
Dust all surfaces and provide them a fast wipe-down.
Soft fabric.
Strip the mattress, lift and flip the mattress (dust the mattress foundation Whilst bed Is lifted) Celebrate the mattress. Leave linen in a heap outside the bedroom before all bedrooms have been finished. After all bedrooms have been done, collect all of the linen and take to the laundry room.
Place any items still staying on your laundry basket off. Pour laundry Basket to laundry in addition to the towels and bathmats.
Instantly spray and wash any windows which are obviously filthy.
Give the entire home a fast vacuum - tough floors, carpeting, the whole lot. Pay Close focus to bedrooms, particularly under and about the beds. Do not overlook the laundry.
Make yourself a cup of tea and then depart sitting out by your preferred seat Together with a fantastic book.
Fence installation and design ideas
- Details
- Category: Your perfect home
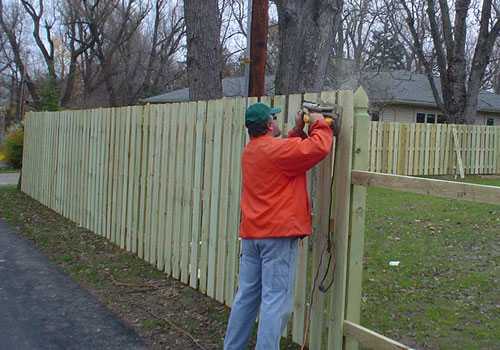
Backyard fence elevation is strictly controlled by the Majority of community or city ordinances. Some places might enable"temporary" improvements into the peak of a six foot fencing to improve height, but these should be readily removed to be eligible. In certain situations a variance might be applied to permit privacy fences to exceed six feet, however that is uncommon and there's generally a exceptional circumstance that warrants them. By way of instance, a lawn that backs up to some commercial property use might be looked at differently as a result of big trucks utilizing a street or parking lot which abuts the rear of a home lot.
Privacy fences are not always very appealing but they are really practical. To give more design and visual appeal, a frequent variant is to produce a ring near the peak of the fence that's only partly solid. Though it does undermine some solitude, it enables more air motion in ponds where humidity makes breezes very significant to comfortable outdoor living. For contemporary landscape layout, metal grids aren't rare as are sheets of perforated metals.
Materials Wood
The conventional fence is constructed from wood planks that are painted or stained. There's not any limit to the choices to get a wood privacy fence except the expense of custom design and complete work. Over time this weapon may necessitate sanding and replacements or repainting.
Vinyl
This timber alternative is increasing in popularity because of a vast array of styles and colours. Greater durability and reduced costs make this a fantastic selection for low maintenance landscapes. Clients asked for fencing which is not only a white smooth surface, therefore we developed more colours and textures that are best for privacy .
Sheet metals
The introduction of industrial substances to the residential fencing marketplace is Driven by the rising popularity of contemporary architecture. The all-metal privacy Fencing additionally solves issues and increases strength in areas of intense This contemporary Substance is a favorite for recovery of elderly midcentury houses also. Even though Accessibility, another assortment of alloys is proving tremendously appealing. The alloy Panels used to build metal industrial structures are created in huge sizes For skin. They Can Be Found in different rib designs which are powerful And made to take substantial weather strain. Above all they're Powder coated, which provides a new assortment of colors to metal fencing to expand Well beyond silver coloured galvanized materials.
If you are looking for professionals, contact fence Installation Columbus Ohio for privacy fence design and installation.
If you are looking for professionals, contact fence Installation Columbus Ohio for privacy fence design and installation.
Inspiration for creating a perfect deck
- Details
- Category: Your perfect home
Professionals from Decks Columbus, Ohio constructed the desks from sustainable ipe wood. Drought-tolerant plants require only annual trimming and occasional watering--that leaves lots of time to reunite on a lounge chair and bask in sunlight.
Wraparound space
A deck wraps around the majority of the upgraded ranch home, nearly doubling its Square footage.
Evening chill
This garden is optimized for comfort. A stone wall fringed with Berkeley sedge divides a lesser paved terrace in the raised redwood deck and spa. The amount change makes the little backyard look bigger. At nighttime, strings of bistro lights emit a gentle glow, such as starlight, over the spa.
Rooftop stinks
A rooftop deck above the garage Provides the second floor of the Denver home added outside area.
A Fantastic deck can catch a view, make a comfy outdoor space, and include a Sense of spaciousness to a residence by blurring the boundaries between indoors and outside.
This partially sheltered deck functions as an indoor-outdoor distance linking a Living room with a terrace. Classically simple, it's a fantastic transitional element for almost any style of home. You may even build yourself!
Subtle attraction
Gray is the best colour for incorporating subtle detail, such as this deck. Soft grey plays the pink to get a relaxed, feminine vibe.
Taming a incline
A deck at the Peak of the sloping backyard transformed the area into an Inviting destination for carrying in the view.
The back edge of the 15- from 24-foot deck notches to the mountain. A low Retaining wall retains the uphill part in position and doubles as a different seat seat.
Live outside Backyard which doubles their living area. Together with the huge kitchen window and glass door (that is normally left open on fine days)they consider it an extension of the room. Throughout the summertime they do a whole lot of al fresco diningroom, hosting friends for barbeques, and a lot of time playing with their kid and puppy. Besides the expansive deck, there is a grassy play area surrounded by northwest-friendly plants, along with a veggie garden implanted at the strip of the"older California driveway" Bedroom deck in which the household grows berries, herbs, and a miniature succulent garden, revealing a whole lot could be packaged into a tiny outside area.
Colorful character The house. The dark floor creates the ideal background for contrasting pops of glowing orange.
Poised for your opinion
This Very Small deck off the side of the modern cottage house demonstrates that you don't Require a great deal of room to create a large announcement. The deck is large enough for seats and even a little dining table, which makes it the ideal place for morning coffee or a day read--or merely a perch for taking in the wonderful wooded environment.
Heal the outside like the interior It seems just like the living area and deck are just one. The homeowner picked outdoor furniture which completely meshes with what is inside.
Lucky leftovers Previous owners. Prior to building anything structural from found stuff, have a builder or carpenter check the substances for harm.
A deck away from this cottage near Twisp, Wash. adds Still Another area to a little Home full of innovative living spaces.
Concrete measures off the deck expand the home further, resulting in a different Hang-out distance on the granite stones below.
Important summer clean-up ideas
- Details
- Category: Your perfect home
Every season brings particular cleaning struggles. You may take Additional caution To make certain you don't monitor in snow or street salt to your house in the chilly, and you may provide your laundry room a few TLC as soon as your children return to college in the autumn and have sports gear that requires cleaning.
Now that is it's summer, you will want to change your cleaning priorities Around a little. With all the excess time you and your household spend outside this year, there is sure to be some serious messes to clean up around your house. Here would be cleaning services montgomery tips to follow these Upcoming couple of months:
The intense humidity and heat of the summer creates the ideal breeding ground for mold and mildew. A buildup of those germs could indicate irritating particles wrapped up in the atmosphere and in your clothing - and it may also result in a leaky washing machine. Luckily, you do not have to perform much extreme cleaning to maintain the irritants and odor at bay. Attempt only pouring a cap filled with detergent in a vacant load and operating a cycle to wash out the machine. Do this once a month through the summer to maintain smelly mold and mildew to a minimal.
Wipe Seasonal Equipment
Summer activities are usually water-based and outside, so a great mixture of sand and dirt is guaranteed to wind up on all your gear. Moreover, the opportunity of fungus growth is looming. Pool and beach gear, such as floaties and shore and dining table umbrellas, can harbor moisture that contributes to mould and mildew. Wipe down all your supplies using a cloth soaked in vinegar to split through the dirt and maintain your summertime equipment in top form.
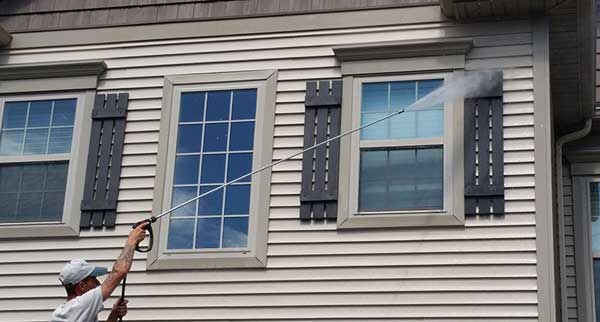
Your patio furniture may also get dirty if it is sitting out all season. It is possible to either wipe down these precisely the exact same way you want other possessions, or you can power clean them .
But it is almost impossible to maintain all the sand in the shore. It is bound to wind up on your vehicle, in your own carpeting in your house and in strategic areas on your bedroom and toilet. However nicely you dust and vacuum, you are guaranteed to see small pebbles in each corner in the weeks which follow.
There are several best practices for maintaining sand out of travel with you. For starters, have everybody hose down themselves before stepping foot in The vehicle. Some public shores have outside showers that Enable you to Conveniently cleared your body and shore equipment of sand prior to loading up your vehicle. Use them on Additionally, vigorously shake clothing and When you buy home, Keep all the gear outside or at the sand room. As Soon as You bring it Inside, you are bound to take in some sand also. 1 final shake before cleaning it correctly and returning it indoors.
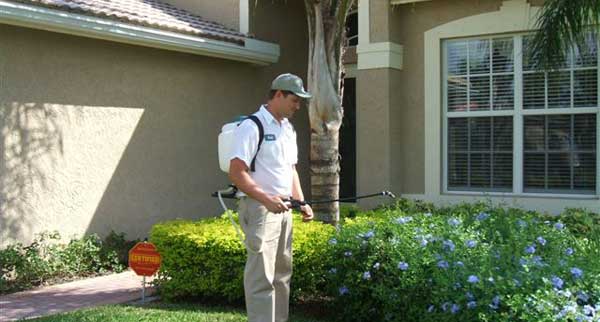
How to clean your house after bed bug extermination?
- Details
- Category: Your perfect home
Nobody wants to Manage bed bugs, But more than this, no one wants to take care of bed bugs twice. If you've recently had to deal with these pests, the best way to clean your home after the bed bug therapy may affect how successful the treatment is in the long run. Below, we will cover the basic cleaning measures to follow after a bed bug infestation, but be sure to talk with the bed bug extermination columbus ohio that treats your own home or business for any particular instructions.
Give it Time
One of the most important matters to Understand before you begin cleaning is as soon as you can wash. Many treatments take several weeks - provided that 21 days - to fully do the job, therefore cleaning the incorrect things before that time has passed may limit its effectiveness. Typically, it is recommended to wait 30 days before cleaning most floors, the bottom foot of walls, and some other walls alongside appliances.
It is also Extremely Important to abstain From shampooing or steaming any soft surfaces in your house, including carpets, rugs, upholstered furniture, and draperies until now has passed. It's possible, however, vacuum as needed, provided that you change the bag in the vacuum once every time you use the vacuum cleaner. If your vacuum is bagless, empty the canister after each use, double-bag the contents, and discard them out the house when possible.
The one thing you can and should Clean immediately following a bed bug infestation therapy is flat surfaces which you use regularly -- dining tables, end tables, coffee tables, kitchen counters, and stove tops should all be wiped clean with soap and warm water.
Focus on the Removables
Comes to cleaning what else is if it's soft and you'll be able to pick it up, you Should wash it, with a concentration on heat, which can kill Any residual bed bugs. Use the following tips to assist rid all fabrics in Your home of bed bugs:
Animals, cushions, chair cushions, and some other soft items in your property That may be washed in your washing machine (or at a laundromat) should be Washed in bleach or color-safe bleach at the highest temperature possible.
Each of the aforementioned things should be Dried in the dryer on its greatest heat setting for a minimum of two hours. Make Sure You not overload the dryer to ensure the heat can permeate all the fabric.
Any items that Can't Be washed, which can Using a steamer to kill any bed bugs with the warmth. Should spend a minimum of 2 hours in a high-heat drier too.
House cleaning habits
- Details
- Category: Your perfect home
In this article we published the greatest advice from house cleaning services columbus ohio that will help you to create regular cleaning habits to make your house shine.
It is not just that clean laundry smell. Running your sheets Through the washer away built-up sweat, germs, and body oil. The longest you ought to wait until changing out your sheets is fourteen days. Weekly is even better.
It is not just that clean laundry smell. Running your sheets Through the washer away built-up sweat, germs, and body oil. The longest you ought to wait until changing out your sheets is fourteen days. Weekly is even better.
Twist them in the washer onto a"normal" or Hotter water will destroy much more germs, so pick the warmest temp your valuables can handle.
If you are grossed out thinking about all the perspiration from your Body, just think about all of the makeup and oil smudges which come your face off.
Launder only two at a time and use a small Quantity of Profit Then toss'em in the dryer with rubber dryer chunks to help plump the filling.
Even in the Event That You clean them regularly, your pillows won't last Forever. If you fold the pillow in half, and it will not spring back into shape, plan to get a shopping trip.
The exfoliation feels so good, but the germs that lives In your loofah? Not as great. Moist nooks and crannies filled with dead skin cells function as ideal breeding ground for organisms which can lead to skin infections.
Natural sponge loofahs must hang around no longer than Soak them in a diluted bleach solution at least each week and then throw upon any signs of mold or mildew. You might need to prevent restocking altogether, though.
There's no need to throw away your shower curtain once it's dirty. Toss plastic or vinyl liners in the washer to the hottest setting with a little detergent. (Follow the instructions on the care label for other sorts of drapes.)
Avoid future problems by providing your curtain a chance to Dry out: Turn on the exhaust fan whilst showering, open the door or window afterwards, and keep your drape open instead of pushed into the side.
The absolute best way to wash a sponge would be to soak it in a Gallon of water mixed with 3/4 cups bleach for five minutes, but even that won't create your sponge last forever. Tossing them frequently will help keep your countertops cleaner and prevent foodborne illness.
While not as powerful as the bleach method, you can additionally
Coffee makers can hit the mould, Yeast, and bacteria trifecta, so washing the dishwasher-safe pieces every day is Absolutely crucial if you do not want a dash of germs along with your breakfast blend. Regularly running a vinegar solution through the system also prevents the Build-up of hard water minerals. Otherwise you might detect your brew taking Longer to drip.
Cleaning checklist for summer season
- Details
- Category: Your perfect home
Share of chores which might have to be handled more frequently. Luckily, you will have many added hours of daylight, which actually come in handy when there are added cleaning jobs to look after. And remember: If you've got children home from college, you get an integrated group of helping hands.
Would you understand which areas of your house might need more care once the days heat up? The subsequent cleaning checklist from Maid Services Mason, Ohio can help keep you on top of those seasonal chores so that you do not get the summer blues.
Floor cleaning
Whether the children are conducting Forth and back to the pool or you are coming and going more frequently to tend to a own vegetable garden, your house will find a good deal of additional foot traffic in the summertime. This means that you might need to wash the floor a bit more regularly. Make it a point to place clean your floors as required and wash or vacuum high-traffic areas a couple of times per week.
Hint: Invest in a fantastic doormat and instate a"no shoes in the house" principle to reduce the frequency of which you've got to pull floor-cleaning duty.
Among the greatest things about Summertime is that the foods it attracts. Regrettably, ice cream, hamburgers dripping with ketchup and barbecue sauce may raise the total amount of summer cleaning you must do. So keep lots of clean microfiber fabrics on the counters or at the pantry so you've got them easily accessible for spills.You'll wish to tend to spills ASAP to stop needing to chisel goop from counters in the future, and of course prevent a path of ants parading throughout your own kitchen. So add wiping counter tops and dinner tables after meals to prevent these hassles.
Hint: Have children enjoy lunch and summer treats such as popsicles out to cut back on indoor meals spills.
The season's warmth can bring out The pungent odor in your kitchen garbage cans, therefore expect to drain those more frequently. Additionally, summer's messier food items can indicate you will want to clean your garbage can on a weekly basis. Remember that all those apples and pears you are using for sangria and bite period might begin to decompose more rapidly this season. Ensure you understand how to properly wash your sink to keep the odor from getting out of control.
Hint: Save lemon rinds from home made lemonade and conduct them through your garbage disposal therefore that your kitchen aromas fresh and bright.
Laundry Duty
Swimsuits, sports and towels Additionally, this is a rather simple job that older kids need to have the ability to control. Look at adding drying, washing, folding and stowing linens and clothes for their summer chore listing.
Bathroom Care
The humidity and heat which accompany summertime in several areas Means you might need to present your bathroom some excess TLC. Summer cleaning, bathrooms should be tended to at least two times per week. Furthermore, you will want to Be Sure you're working exhaust fans while still This will help slow down Down the spread of mould.
Hint: Stock up on microfiber fabrics and leave them close to the shower so Which it is easy to wipe down shower doors and doors after every use.
Finding it Hard to enjoy the season when handling these additional cleaning chores? Let your Regional Merry Maids Look after the housekeeping so You're able to take advantage of your summermonths.
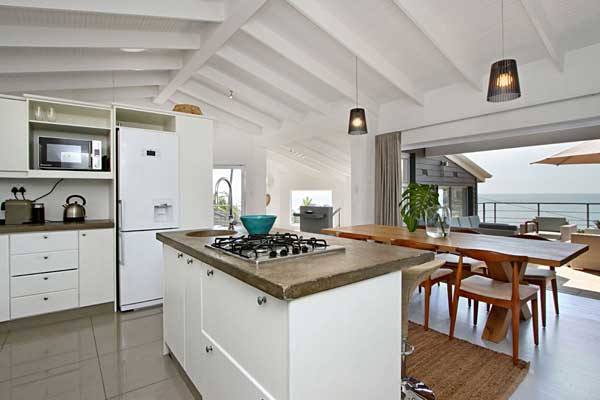
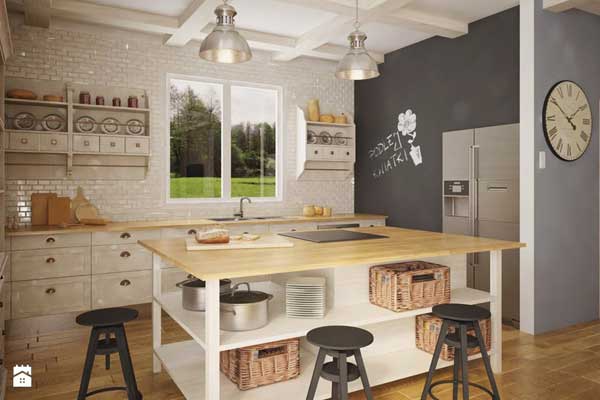
How to create kitchen and bath showroom?
- Details
- Category: Your perfect home
The possibility of buying new cabinets for the kitchen is unquestionably Exciting, but in addition, it can look overwhelming in light of the numerous choices you need to pick from. Because kitchen cabinets play such an essential function in the general appearance and functionality of your own kitchen, it is wise to rush into a decision without considering each the major factors which come along with this kind of purchase.
Is to stop by a kitchen cupboard showroom. Seeing a showroom is essential for any range of reasons; for you personally, it is possible to really observe the cabinets at"3D" and examine their real-life performance along with your hands. This will offer you a more thorough outlook versus just perusing distinct layout magazines or sites and looking at images. Additionally, but by seeing various kitchen cabinet versions in actual life, you're going to have the ability to find a better sense for their real color and dimensions, which could at times be inadvertently skewed by erroneous photography colours or impacts.
Your whole remodeling project. To be able to get the absolute most from your trip, you will want to generate a few vital preparations until you arrive, and also keep in mind several critical things to do if you arrive. Following are a few helpful ideas to get your kitchen and bath showroom look as productive as you can.
Consult with an expert kitchen layout trainer
Out of this veritable universe Of possible renovation options you can create, your kitchen layout trainer can allow you to narrow down those thoughts into a viable set of alternatives according to your tastes, wants and price range. Make sure you assemble a kitchen renovation"want list," and deliver any pages or magazines published from the Web that portray the sort of cabinet designs that draw you. Your kitchen layout trainer will then assist you make a balanced strategy that will allow you to achieve your renovation schedule within a sensible and realistic frame. Even when you're still somewhat unsure about precisely what you need when you reach the showroom, then you can gauge your choices according to what you are able to afford.
Have your cupboard measurements available
You need to measure every measurement of your kitchen cupboard area and have These amounts available until you arrive in the showroom. With this advice, it is possible to provide more precise information to the sales agent, in order that they can provide you with more exact estimates and hints for the renovation project.
Consider Functionality
You should have particular functional elements in your mind, so that your kitchen Cabinets will give you optimal usefulness along with their visual appeal. This may include specific technical features like heavy pull-out dividers, rotating shelves etc.
Evaluation Cabinet Construction
Do not be afraid to take a hands on strategy to choosing your kitchen cabinets. Open and shut the cupboard drawers and doors to ensure the hinges and drawer slides are of a decent quality. Physically handling the various facets and characteristics of the cupboard models in the showroom will provide you a fantastic idea of the sort of durability and performance you can expect from your cabinets you might choose to buy.
Know about these finer details
It is important to listen to the finer details of your potential Decide if these attributes are exactly what you really desire, particularly in light of the daily functionality. The very last thing you'd want would be to buy cabinets which take a visual allure, but provide relatively little regarding creating your kitchen an perfect food prep area.
Goes a very long way. If you have done your homework utilizing the following hints mentioned previously, you Can optimize your cupboard showroom see and make measurable progress towards Accomplishing your kitchen renovation objectives.
How to improve your cleaning habits?
- Details
- Category: Your perfect home
Therefore, what's the key to keeping things tidy? Think about adding these daily House cleaning customs suggested by cleaning services leesburg, va into your program, and you will be confidently letting buddies through your front door without any notice until you know it.
If there's 1 thing you can command from the day's madness that lies Beforehand, it is your mattress. It does not take but a couple of minutes, however this effortless task sets up your day for success. Even if it's only a hurried smoothing from the comforter, creating your mattress makes it possible to begin your day with a feeling of productivity and purchase that is very likely to carry through the next thing that you do. Utilize a few pans planning breakfast? Should you integrate this into all you do during your day, there'll be a good deal less lying about taunting you afterwards.
Wipe down it until you walk off.
A quick wipe down may perform wonders. Should you wipe the surface down you have used From wiping your glass door to swiping your sink after washing the dishes, a fast clean can stop dirt build up and maintain your surfaces pristine.
Avoid overflowing hampers by providing your washer a workout every day. It is an Unavoidable task (maintaining your household straightened is sort of mandatory ), so in the event that you do it on a constant basis, it will not accumulate and take on your whole Sunday.
Put all paper at its appropriate location.
Maintain Your counters and workplace clutter-free by setting designated areas for newspaper in your house. Create folders for invoices, school memos, and other crucial printouts. Place these things in their location the moment you get them.
Donate what you do not need regularly.
Materials is wreak havoc in houses across the South. Water jar bottles for a household of 4, and it is probably time to eliminate that top your son grow from months ago.
It is easier to maintain a house organized whenever there is less clutter in it. Treasure items with significance, but do not collect unnecessary things. Rather than wasting time trying to maintain things you do not want under management, have some time and purge a number of those things you do not want on a regular basis.
Wash your refrigerator on a weekly basis.
Seeing some frightening goop below your grocery store from the corner of the refrigerator? You are not doing it correctly. Offer your fridge a weekly refresh. Not only will cleaning your refrigerator help you maintain matters spick-and-span, but it is going to also help you produce a precise list of everything you need on the following run to the shop.
Constantly clean up after ingestion.
The Longer you allow your pans and pots linger, the tougher they will be to wash. We know that it's been a very long day, but in the event that you quickly rinse your dishes and load the dishwasher after you consume, the faucet will be apparent until you know it.
Do a Fast sweep through your lived-in rooms until you call it a night. Bags are prepared for the following moment. You will thank yourself at the morning.
Make your house sparkle with these cleaning tips
- Details
- Category: Your perfect home
Cleaning the home does not need to be the Type of task that promotes In reality, it is not something to be worried, particularly in case you've got a well-designed program by cleaning services lincoln ma and if you understand a few tricks that could make the process simpler and quicker.
By Way of Example, make things simpler for you by selecting the Proper Sort of broom For the correct sort of surface.
Create a lost and found box in which you place from place items like loose Buttons, only socks, etc., this manner, when you require this kind of item, you will know where to locate it. Use the box to deposit some things your guests may accidentally forget to consider when they depart.
Clean your iron. Simply pour salt onto your ironing board and allow it Wash your iron till it becomes shiny and nice.
Remove pet hair from the couch, mattress and other surfaces with rubber gloves. Simply put loe on and collect all of the hair. It is simple and dinner effective.
Create a Mix from 1/2 cup vinegar plus 1/2 cup olive oil and then use a rag to rub it onto the wooden surface.
Eliminate permanent mark on your flooring using toothpaste. It is such a Easy solution and it does not damage the flooring. A fantastic consideration to bear in mind whenever you have little kids.
Clean your microfiber sofa or sofa with the following things: a white Stained region and then wash using the sponge. Create the surface smooth.
Kitchen remodeling ideas on a budget
- Details
- Category: Your perfect home
Consult kitchen remodeling deer park professionals who can help out with assessing the area, present house values and kitchen styles.
Select a design cohesive with the rest of the House.
Research kitchen tendencies at your house's price point and on your marketplace. Over customization may lower your total yield if you make the decision to sell.
Consider the length of time you'll be at the house. Have you been remodeling for relaxation, both or investment. This can allow you to decide where to splurge and where to store. With all these choices and related cost variability you may go within your budget. Fix quality demands to satisfy budgetary limitations. By way of instance, if you're working on a budget, then select lower tier granite which will look in the same as more expensive ranges.
Contain a contingency in your financial plan for overages. Many renovations operate over budget since strategies are based on perfect conditions. Hidden problems are often shown when cabinets and flooring are eliminated. Give yourself some excess funds for unforeseen expenses. The principal constituents of a brand new kitchen include cabinets, appliances, countertops and floors, but additional expenses can quickly accumulate. Account for costs of demolition, paint, light, new fittings, sink, window coverings, hardware along with some other furniture that is needed. Contain installation costs which could involve plumbing, electric, carpentry, flooring and counter installs.
Be Ready to work with no kitchen for a Protracted period. Among the biggest frustrations using a kitchen renovation is the absence of accessibility to a own kitchen throughout the renovation. Excelling in dining out can easily produce budget overages if you aren't ready. However, you can spare in such regions if your financial plan needs.
Reface cabinets. If the design will Stay unchanged and the layout is great, Adding higher-end hardware may give your kitchen a new appearance without Spending tens of thousands of dollars on brand new cabinets.
Stock cabinets. Pre-built cabinets come in regular sizes. Employing stock cabinetry Might not only save money but also decrease the total time required to Finish the kitchen.
Custom cabinets. This more expensive alternative Permits You to tailor your kitchen Distance having the most effective design to perfectly match your requirements.